Playing around with Storyboarder.ai and something isn't clicking? Maybe the kitchen looks different in every shot, a character you designed keeps being replaced by strangers, or you're wondering why you can't edit your screenplay anymore. Almost every issue we see isn't a bug -- it's either a prompt that needs sharpening, or a feature you haven't discovered yet.
This guide is our answer to the eight questions our users ask us most, with real screenshots and before/after examples for each.
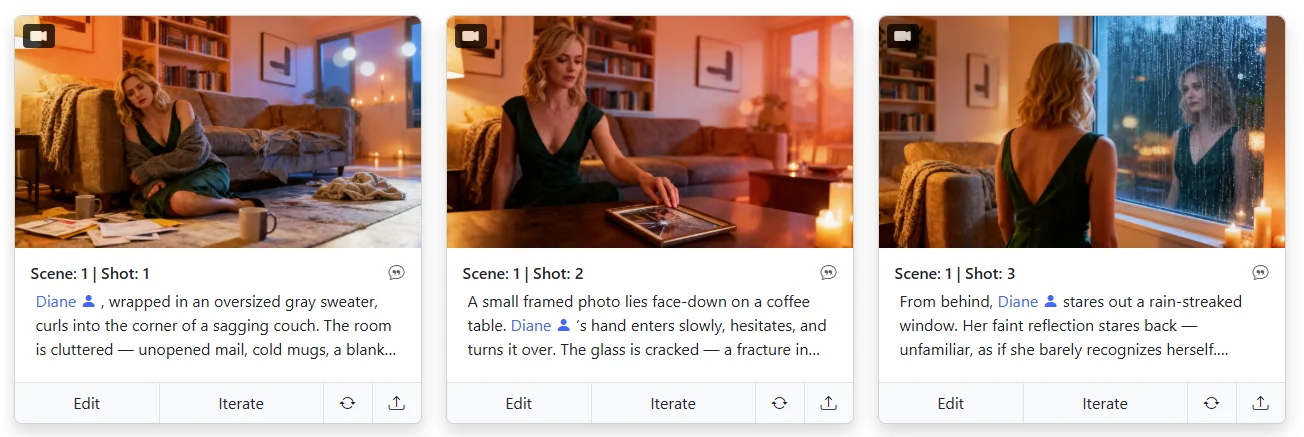
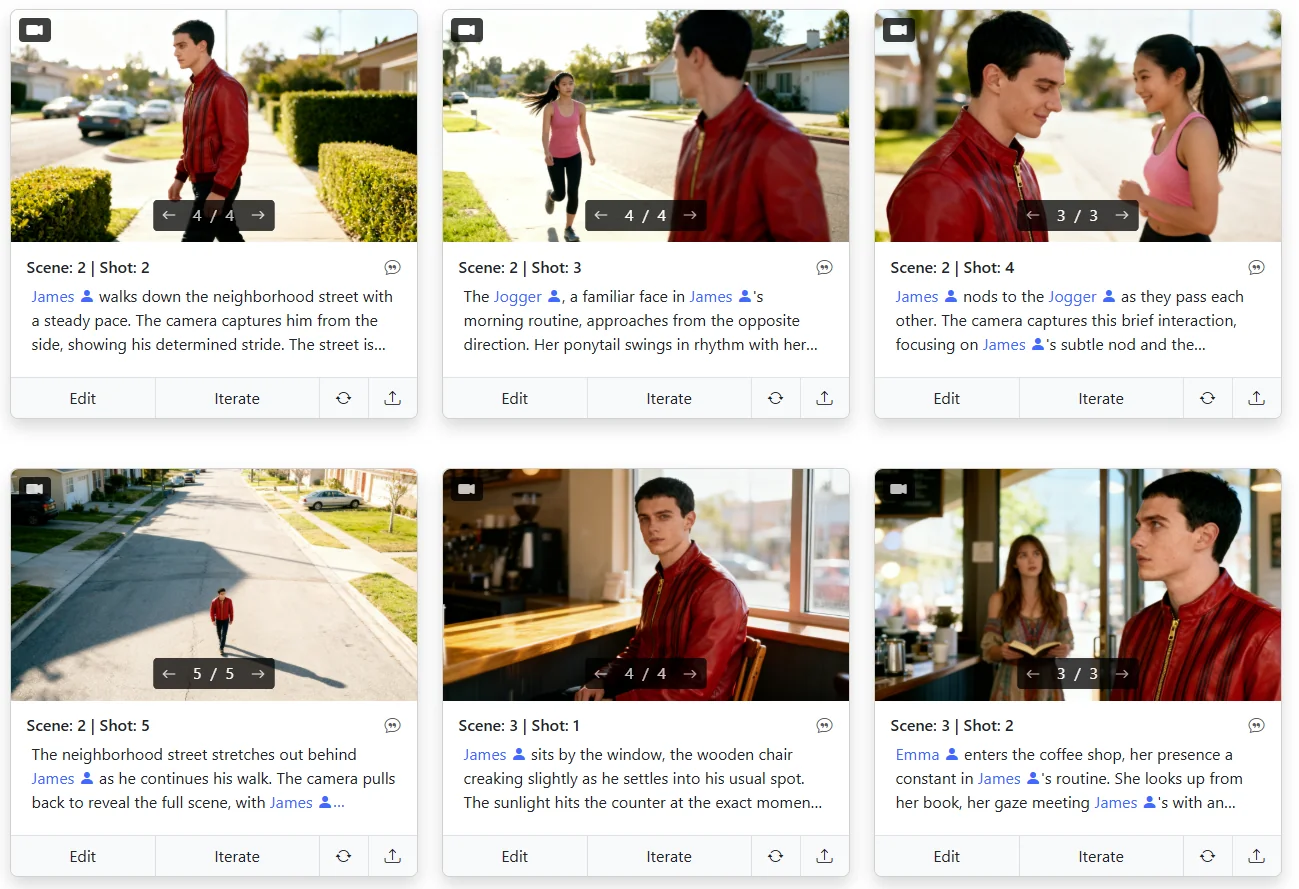
This is the kind of polished, cohesive storyboard you'll be able to build by the end — same character, same location DNA, consistent wardrobe and lighting, every frame feeling like part of the same film:
Let's get into it.
Problem: Every shot of the same place looks different.
Fix: Use the Location Editor with an image reference, and pair it with a clear Scene Heading plus a precise location description.
This is probably the number-one thing people ask about. You set up a scene in a kitchen, generate five shots, and suddenly each one looks like a completely different kitchen. Different cabinets, different lighting, different vibe. Frustrating, right?
The reason this happens is straightforward: a vague scene heading gives the AI too much creative freedom. When all you say is "kitchen," the AI has to fill in every visual detail on its own -- and it makes different choices each time. The fix is to lock your location in so tightly that every shot in that scene pulls from the same visual blueprint.
If text alone isn't enough -- and for most productions it isn't -- the Location Editor is the tool you want. It lets you design a specific place once and then reuse it across every scene that's set there, keeping walls, furniture, lighting, and overall atmosphere locked in shot after shot.
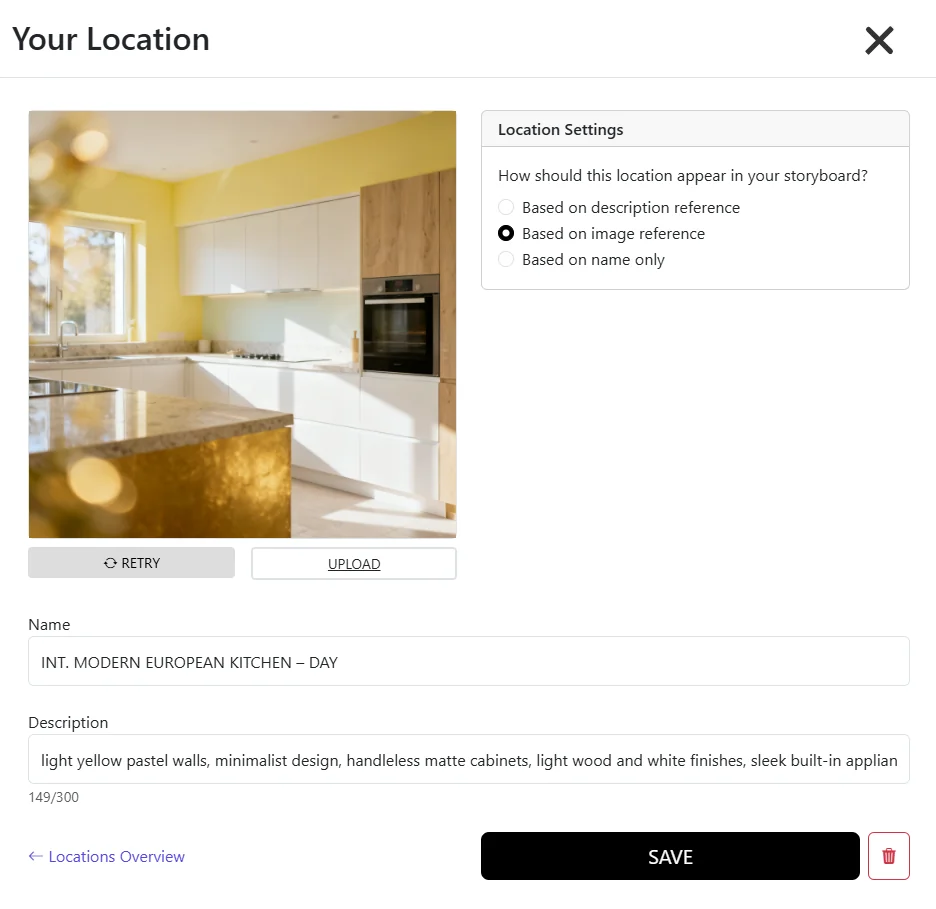
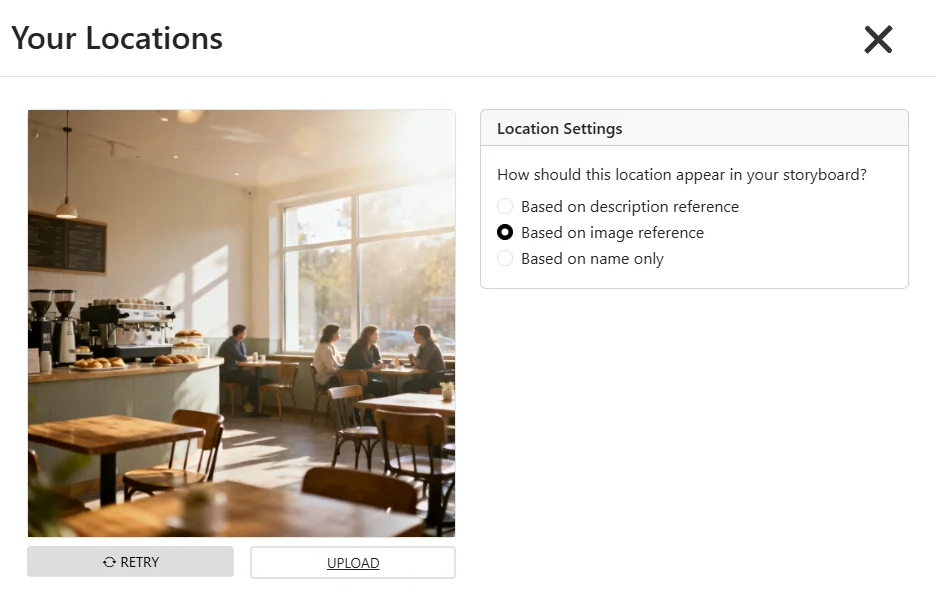
Open the Location Editor from the top menu and you'll see you can either describe a location through a text prompt (and let the AI generate a reference preview) or upload an actual image of the location you want -- a reference photo, a concept painting, even a still from a film you're using as visual inspiration. Once you upload, switch the toggle to "Based on Image Reference". That tells the AI: "Don't invent something close to this, use this." From that point on, every shot tagged with that location is anchored to your reference.
On top of that, fine-tune your Scene Heading and add a precise location description -- the two work hand-in-hand. Keep the heading clean and categorical, then put the real visual detail into the location description. Here's the difference:
Vague prompt: INT. KITCHEN - DAY
Better prompt: INT. MODERN EUROPEAN KITCHEN - DAY
...paired with a location description like:
"light yellow pastel walls, minimalist design, handleless matte cabinets, light wood and white finishes, sleek built-in appliances, a stone countertop"
See what we did there? The heading gives the AI the category and time of day, while the location description carries the actual visual DNA -- colors, materials, finishes, design language. Combined with a locked Location Editor reference, every shot in that scene will pull from the same visual blueprint. After updating your scene heading, go to your storyboard and click Retry on all the shots in that scene -- the environments snap into alignment almost immediately.
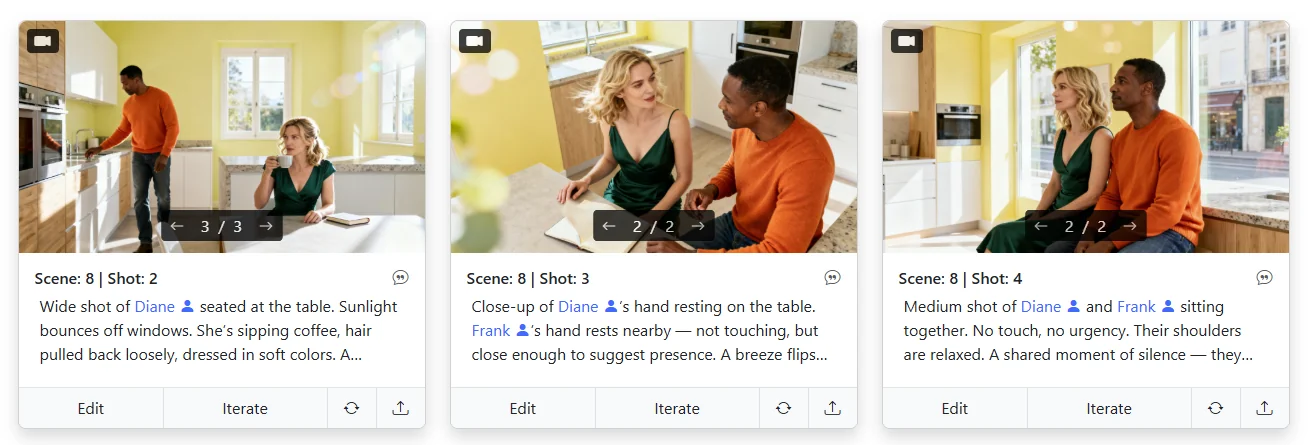
Here's what that consistency looks like in practice -- the same modern European kitchen anchored across every shot in the scene, from wide to close-up, with matching yellow walls, cabinets, and lighting:
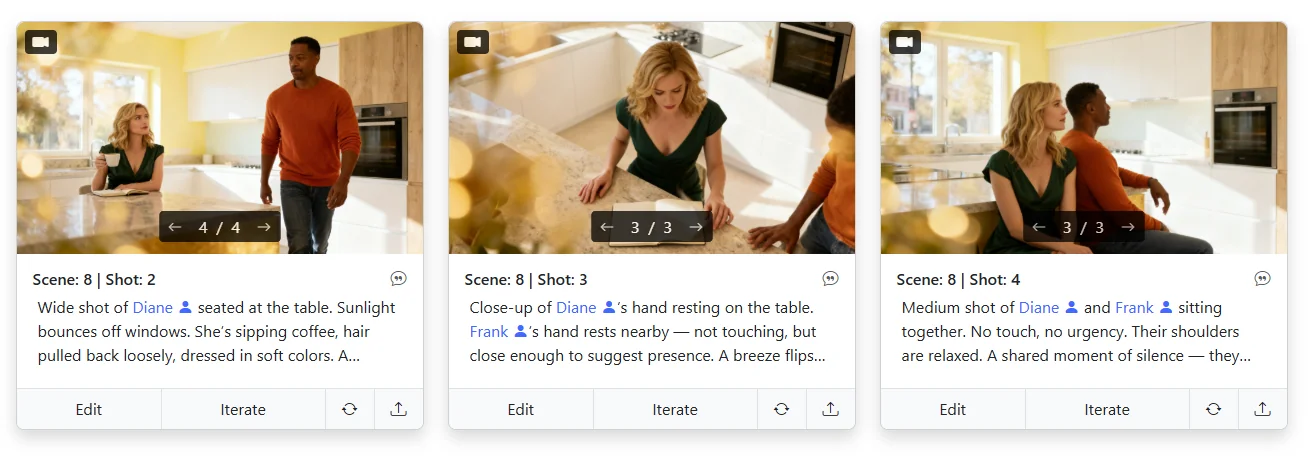
A few tips that make a huge difference:
We've put together a full walkthrough with screenshots and a short video on how to set this up end-to-end: How to create consistent locations with the Location Editor. If location drift has been your biggest pain, watch that first -- it's five minutes that saves you hours.
Problem: You need a different background in a specific shot or across a scene.
Fix: Five options — Location Editor (whole scene), Iterate with a reference image, the UPLOAD "Replace Background", EDIT's "Design Background" text prompt, or the 3D Camera Angle's "Additional prompt" field.
Short answer: a lot. Background replacement is one of the most common asks in any storyboarding workflow -- a scene was generated on a generic street but you need Times Square, or the interior looks fine but the window view should be the Alps. Storyboarder.ai gives you five different ways to swap a background, and each one has its strengths depending on how precise you need to be.
This is the cleanest, most repeatable option -- especially when the same background needs to show up across multiple shots. Open the Location Editor, create (or edit) the location that applies to your scene, upload the background image you want, and flip the toggle to "Based on Image Reference". Save the location, then go back to the storyboard and hit Retry on the affected shots. Because the location is now tied to your reference, the AI will honor that background consistently across every shot in the scene.
This is the right choice when the new background is the setting -- not a one-off visual idea.
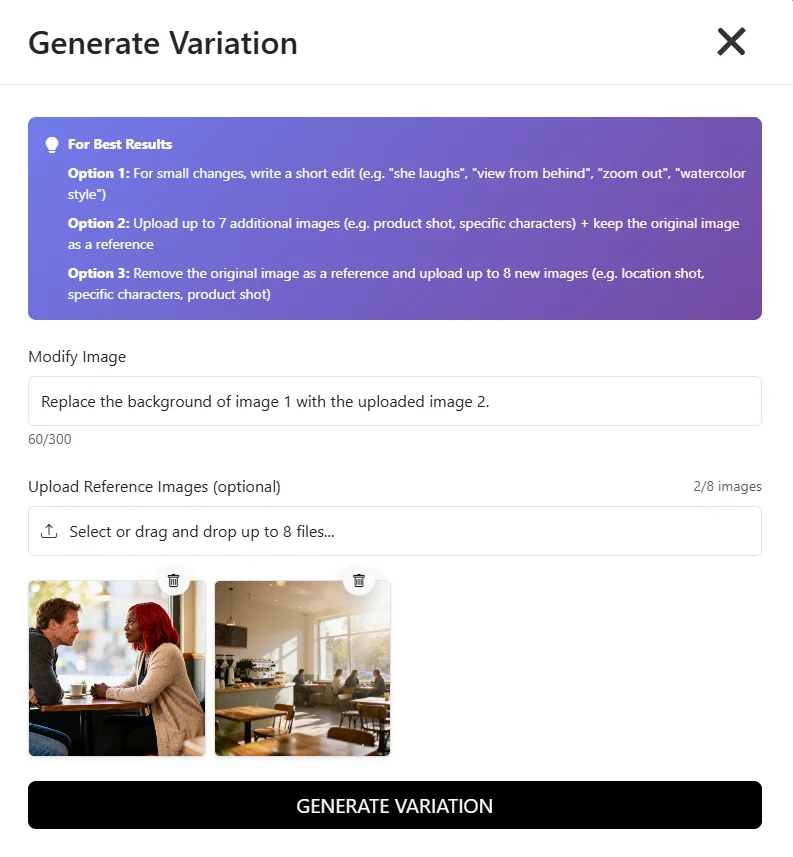
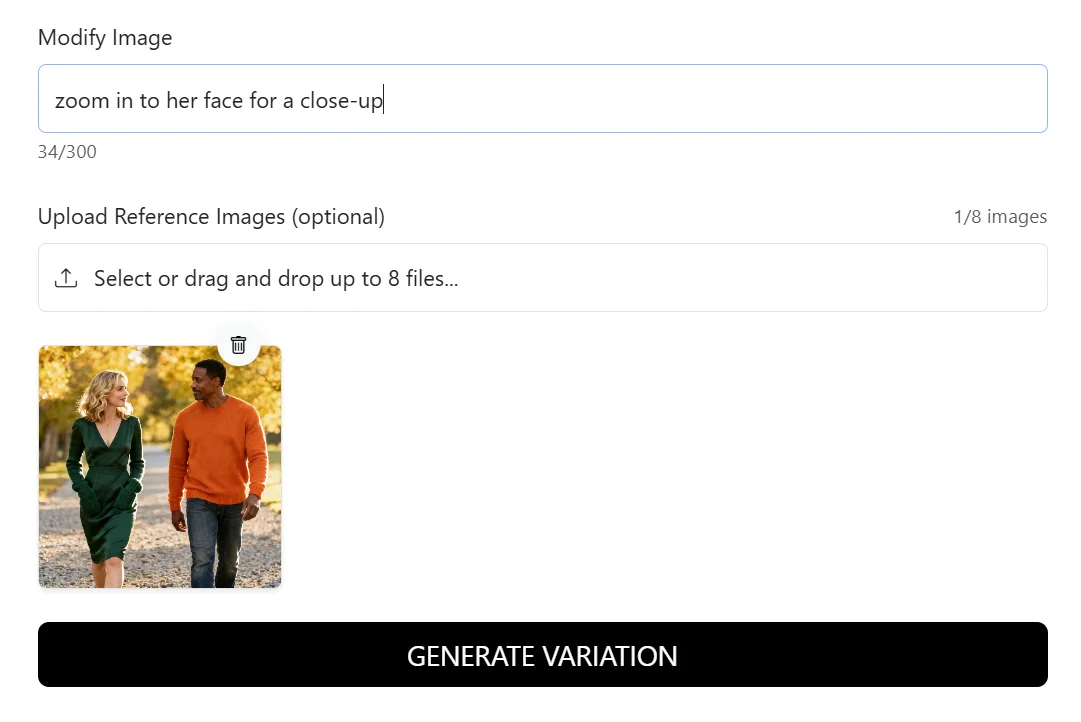
Perfect for a one-shot fix. Find the Iterate button below the shot you want to change and upload an additional image -- the background you want to swap in. Then write a Modify Prompt like:
"Replace the background of image 1 with the uploaded image 2."
The AI keeps your characters, framing, and lighting largely intact and blends the new environment behind them. Great when you want to keep the composition you already love and only change what's behind the action.
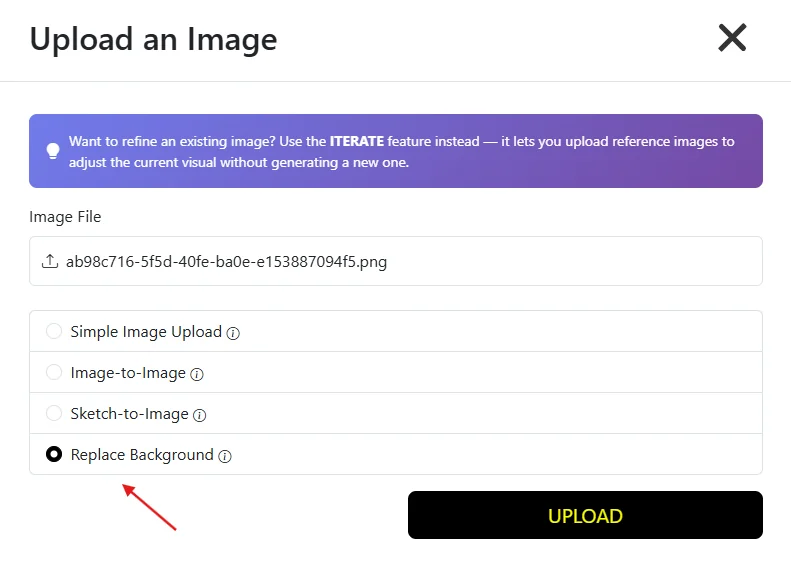
Under every shot image in the storyboard there's an UPLOAD icon. Click it, choose "Replace Background", pick the image you want to use, and hit UPLOAD. This mode leans more on the style and mood of your uploaded image than on its literal content -- think atmosphere transfer rather than pixel swap. Useful when you want a moody neon cityscape feel without caring if it's exactly your reference.
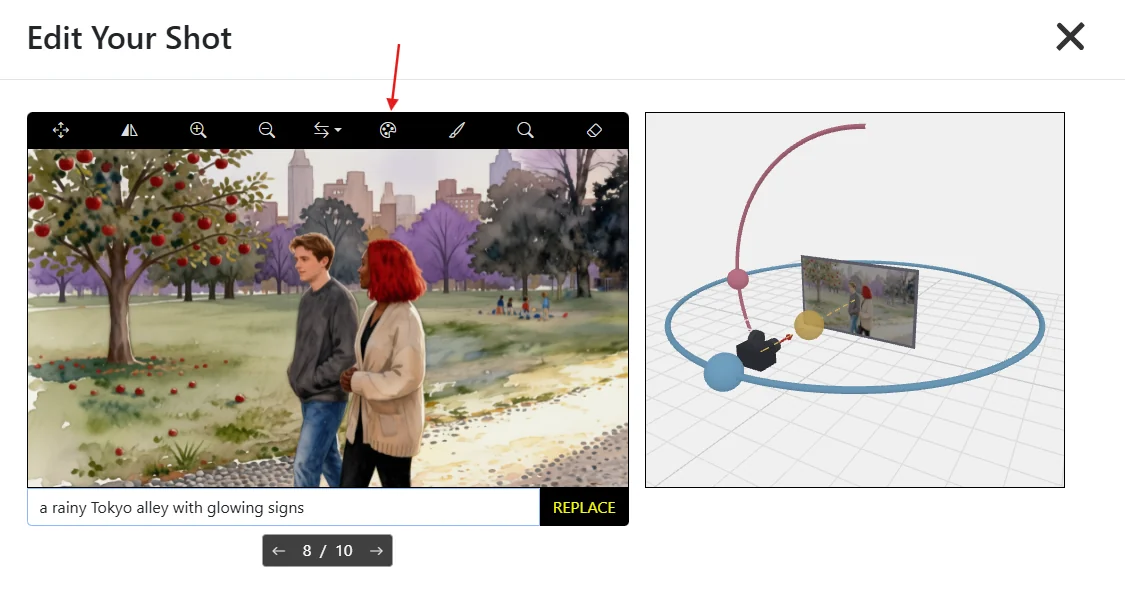
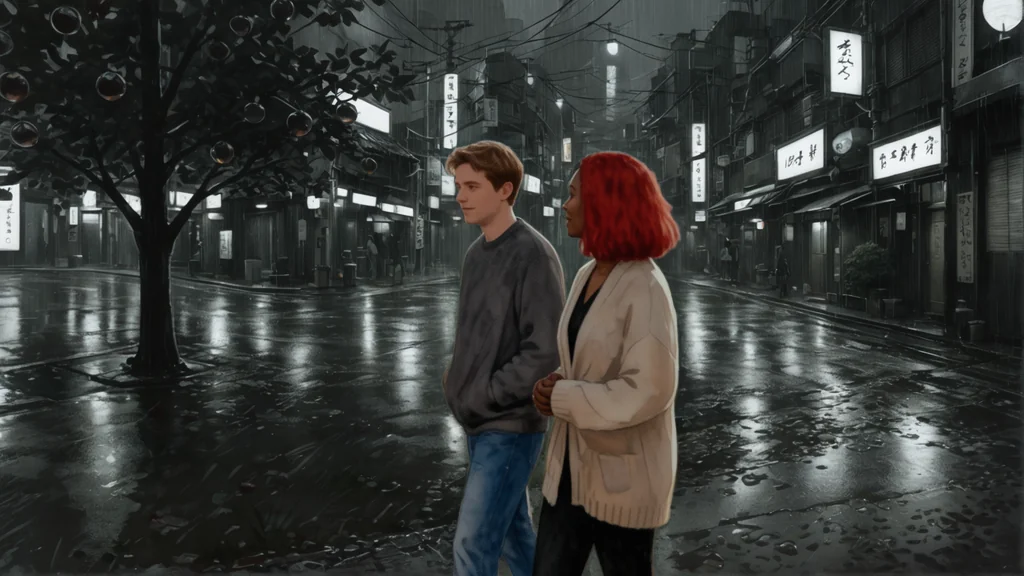
Click EDIT below the shot image. In the toolbar above the image you'll find the "Design Background" tool. Hit it and describe the background you want in plain text -- "a rainy Tokyo alley with glowing signs," "a wheat field at golden hour," anything. This is the fastest way to swap a background when you don't have a reference image but you know exactly what you want it to feel like.
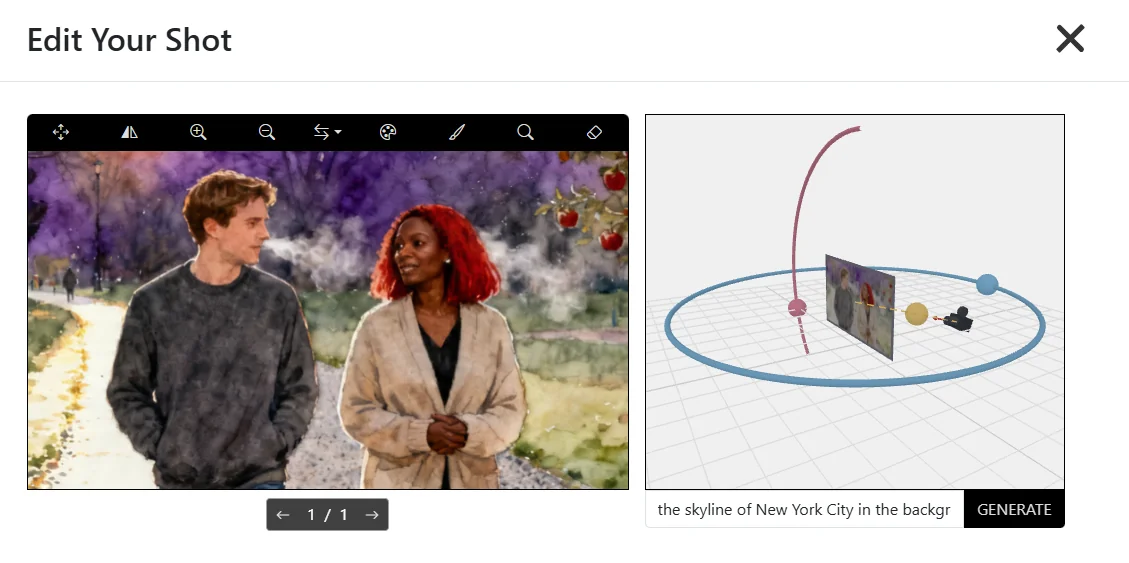
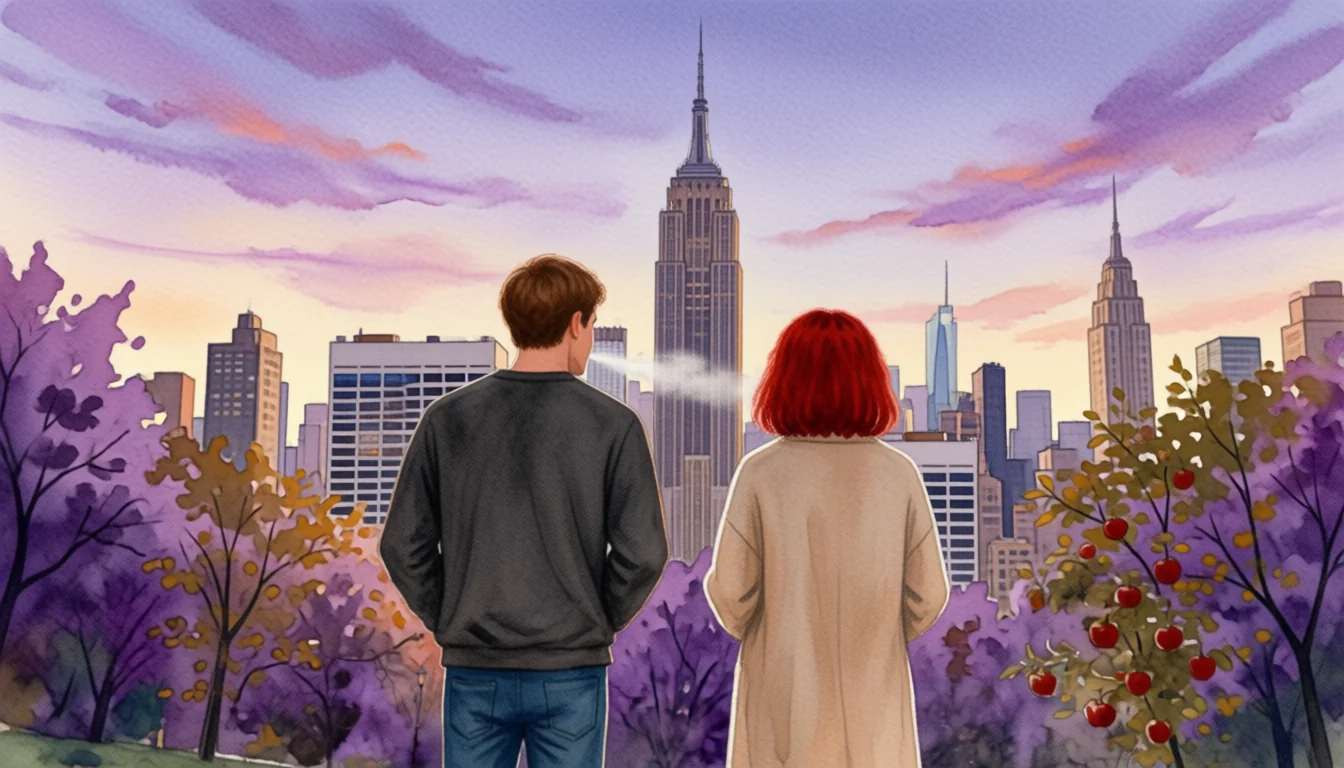
Inside the EDIT view there's also the new 3D Camera Angle feature. Beyond controlling the camera (see the camera section below), it exposes an "Additional prompt" field that you can use to describe background changes at the same time you're adjusting the framing. For example:
"the skyline of New York City in the background"
This is powerful when a background change needs to happen together with a perspective shift. For a deeper dive on this feature, see The new 3D Camera Angle feature in Storyboarder.ai.
If the background belongs to the whole scene, use option (a). If it's a single shot, try (b) first. Use (c) when you want the vibe of a reference more than the literal image. Use (d) for pure text-prompted swaps. And use (e) when the camera is also changing.
Problem: Your Screenplay and Scene Breakdown lock as soon as a storyboard or shotlist is generated.
Fix: Keep editing from the Shotlist — add scenes anywhere, duplicate shots, rewrite descriptions, then hit Retry in the Storyboard view to refresh.
Here's something worth understanding early, because it surprises a lot of new users: once you've generated a storyboard or a shotlist from your script, the original Screenplay and Scene Breakdown are locked. You can't go back and rewrite dialogue upstream and expect it to flow down. That's by design -- it prevents cascading changes that would wreck your carefully crafted shots.
But -- and this is the important part -- your story isn't frozen. You can keep editing and expanding it from the Shotlist, which stays fully editable at every stage.

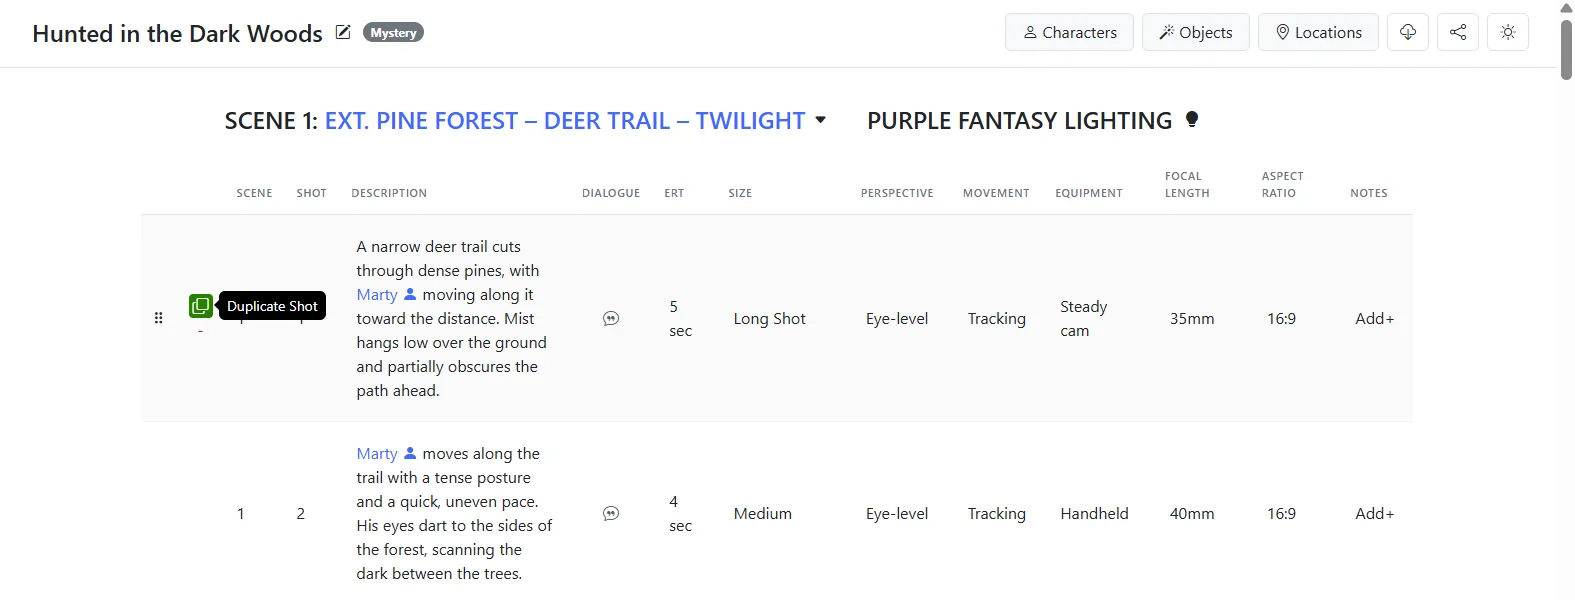
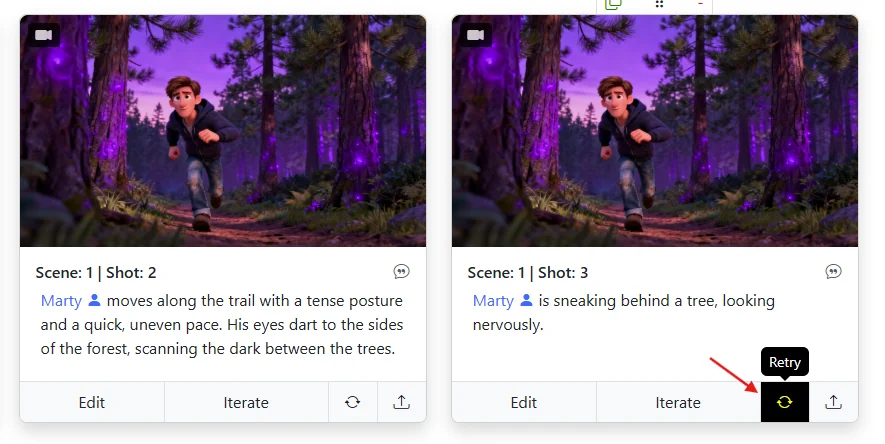
This workflow is what makes Storyboarder.ai feel more like a living writers' room than a one-shot generator. Your shotlist is where the story actually lives after the script lands, so treat it as your editable source of truth. Once you hit Retry on an edited shot, the AI regenerates just that frame -- here's a before-and-after of a Shot Description change refreshed in the Storyboard view:
Problem: Framing or camera angle is off.
Fix: Use the new 3D Camera Angle feature to pick the shot visually. Or adjust Shot Size / Perspective, Iterate with a camera prompt, or use EDIT's Mirror, Zoom, and Extend tools.
You've got a great scene, the characters look right, the environment is on point -- but the camera is doing its own thing. Maybe it's way too close when you wanted a wide establishing shot, or it's giving you a straight-on angle when you needed a dramatic low-angle look.
Good news: this is now one of the most powerful areas of the tool, thanks to the new 3D Camera Angle feature.
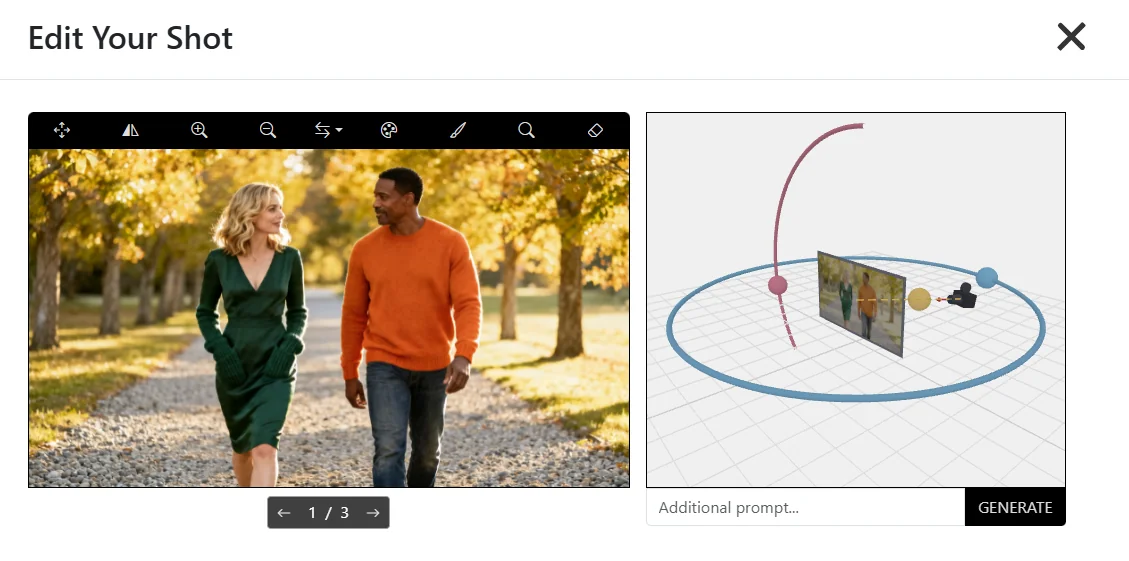
Open any shot in EDIT and you'll find the 3D Camera Angle tool. Instead of guessing at prompts to nudge the camera, you get a real 3D viewport of your scene where you can orbit, tilt, push in, pull out, and re-frame like you would on set. The AI then regenerates the shot from exactly that camera position -- keeping your characters, lighting, and scene context intact.
What makes this so useful for storyboarding:
For the full walkthrough with examples, read The new 3D Camera Angle feature in Storyboarder.ai.
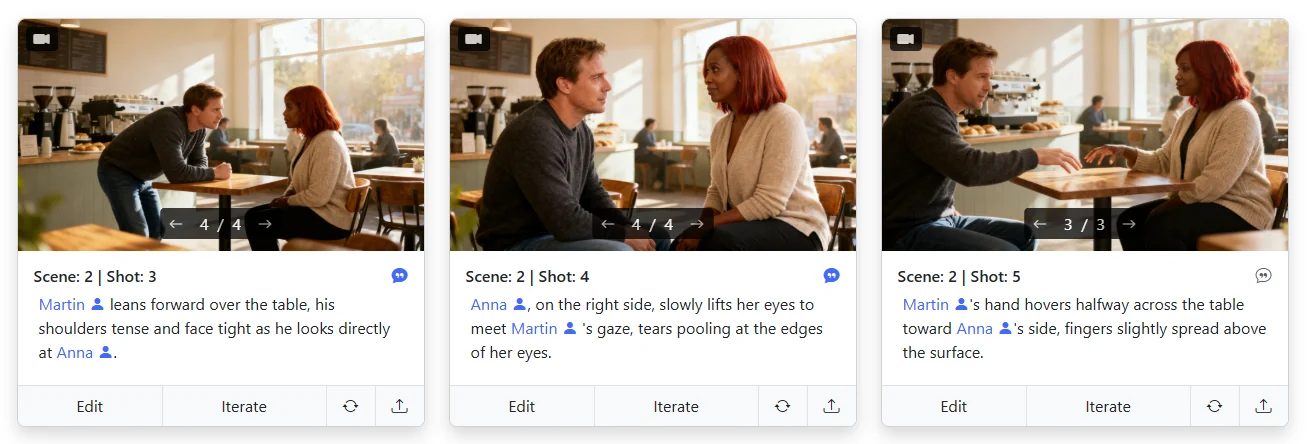
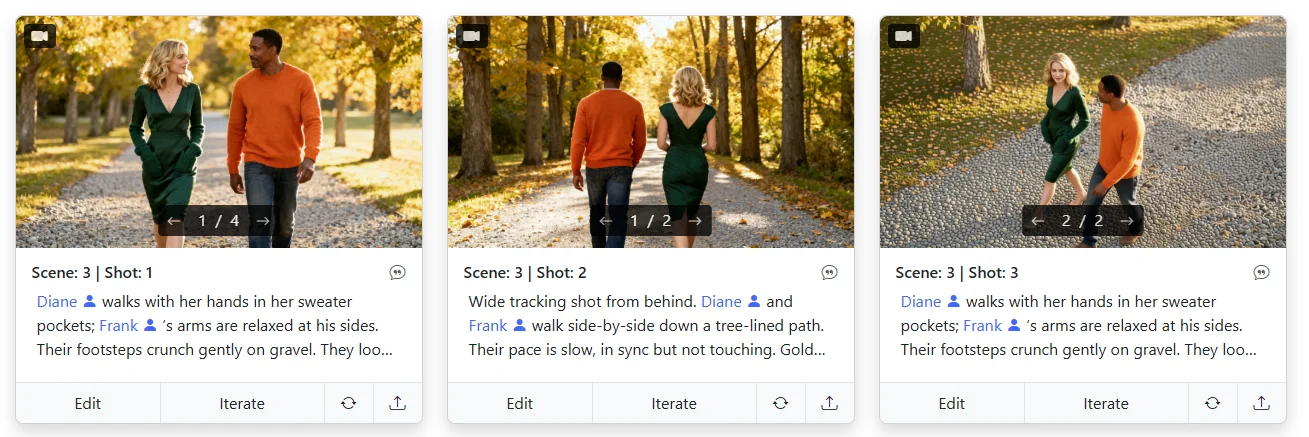
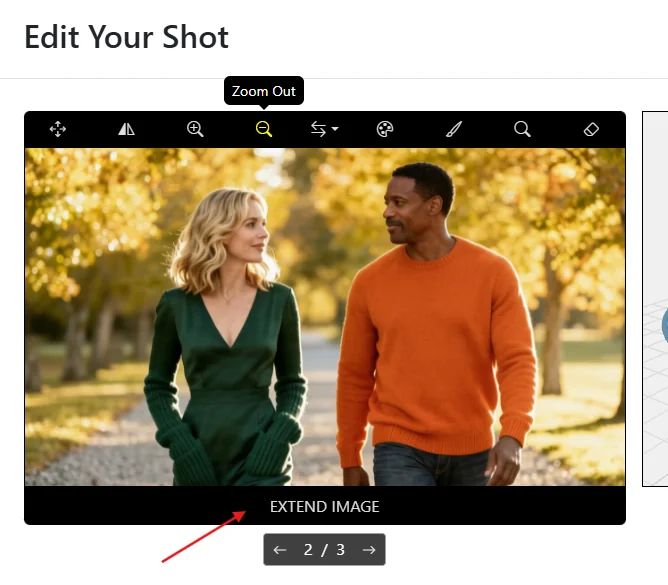
Here's the kind of coverage you can build in seconds — the same scene captured from multiple perspectives without regenerating from scratch:
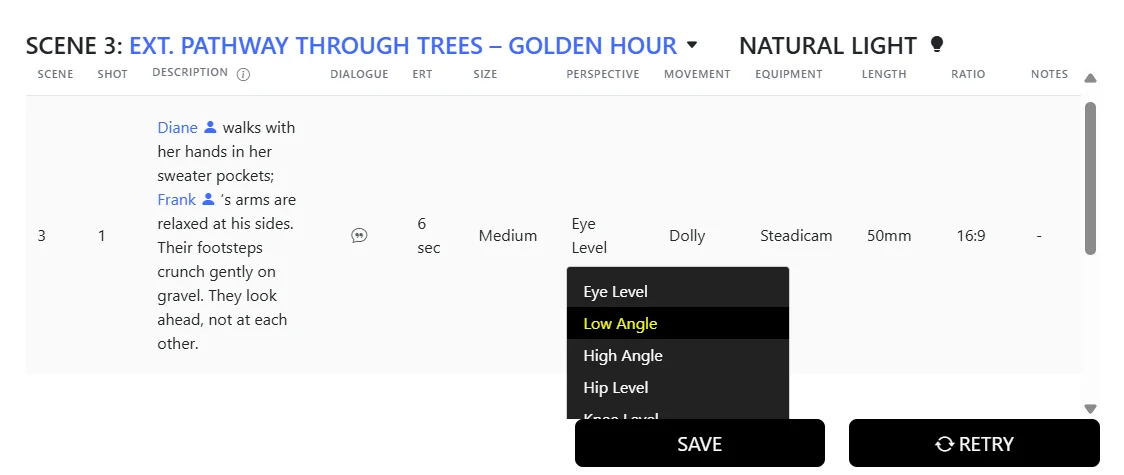
Open EDIT on a shot and you'll see dedicated fields for Shot Size (Wide, Medium, Close-Up, Extreme Close-Up) and Perspective (Top View, Low Angle, Side Angle, Over the Shoulder, and more). Set the ones you want, reinforce the same idea in the Shot Description (redundancy is your friend -- the more ways you communicate the same idea, the more reliably the AI delivers), and regenerate.
Below any shot image, hit Iterate and write the camera change you want directly in the Modify Prompt. Examples that work well:
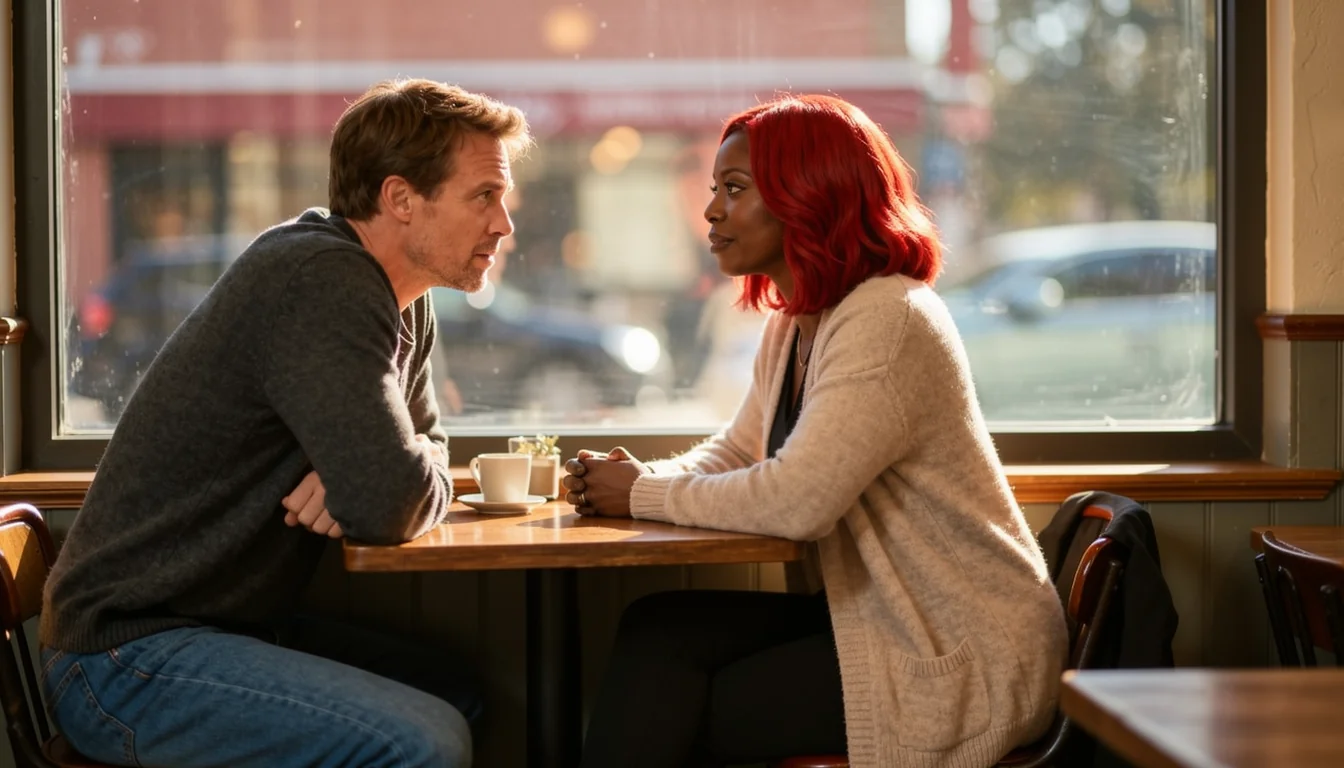
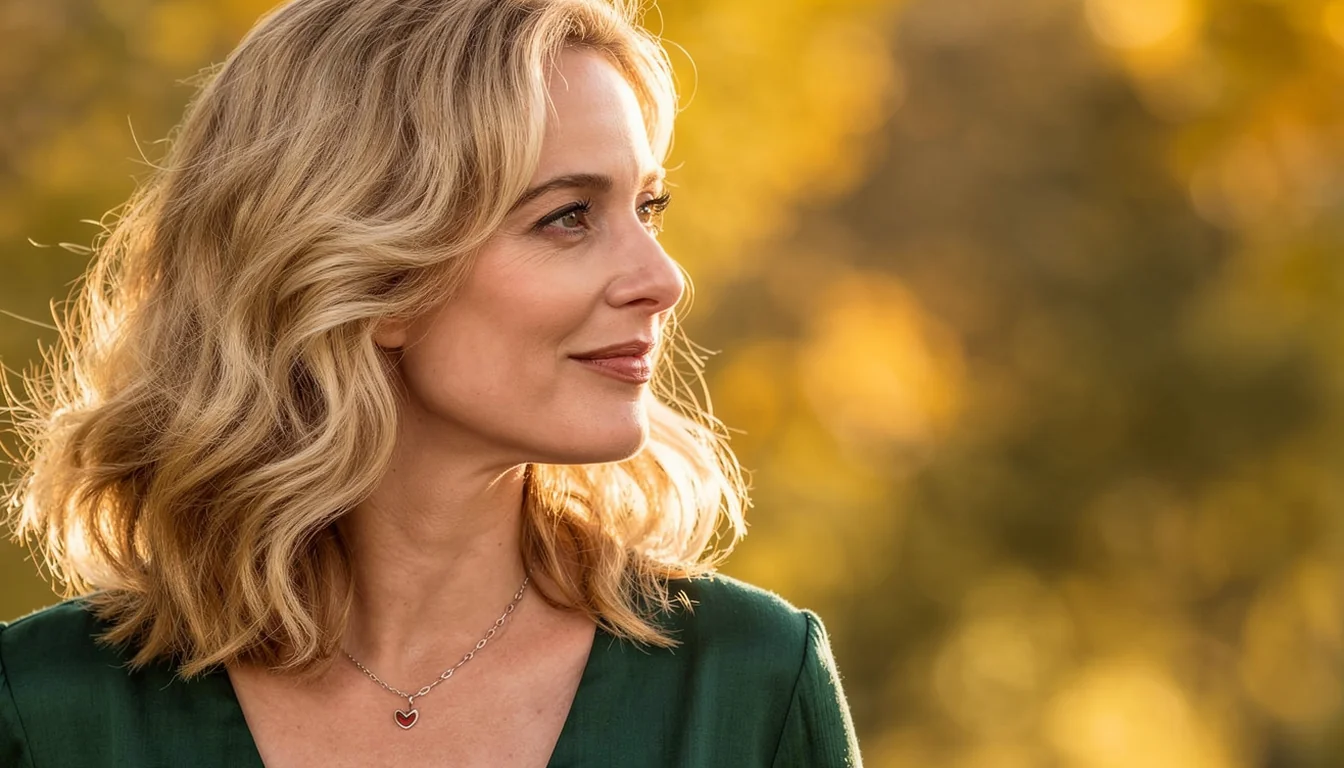
Iterate keeps the composition's DNA (lighting, character look, scene context) while re-staging the camera. Here's a zoom-in prompt in action and the close-up the AI returned from the original wide shot:
For simple, minimal tweaks, the fastest path is often the toolbar inside EDIT:
Apply, save, and you're done -- no full regeneration required. Great for polishing a shot that's 90% there.
Problem: The AI keeps rendering a character you didn't want in the frame.
Fix: Rewrite the Shot Description to drop the name, erase the unwanted part manually in EDIT, or Iterate with a "Remove X" prompt.
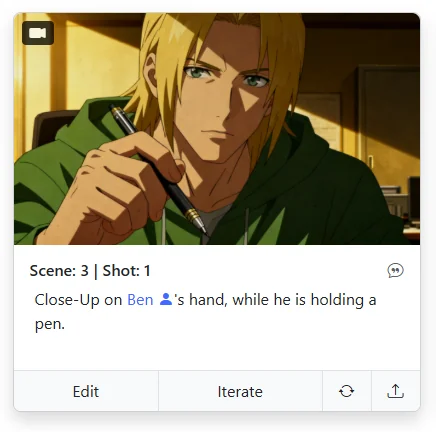
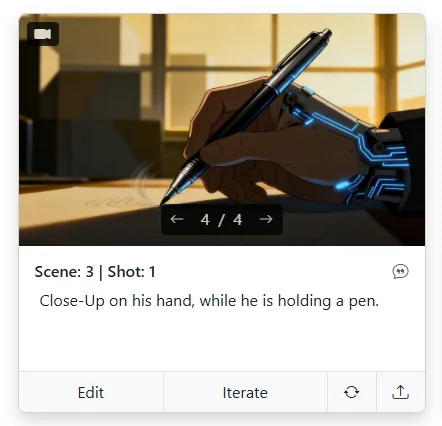
You've written a simple insert shot -- say, a close-up of a hand holding a pen -- and the AI stubbornly keeps rendering a full person in the frame. Why?
Usually it's because your Shot Description contains a character name. For example:
"Close-Up on Ben's hand, while he is holding a pen."
The AI spots "Ben", pulls him from your character library, and tries to visualize him -- even though you only wanted the hand. It's trying to be helpful; it just doesn't know you're going for an insert.
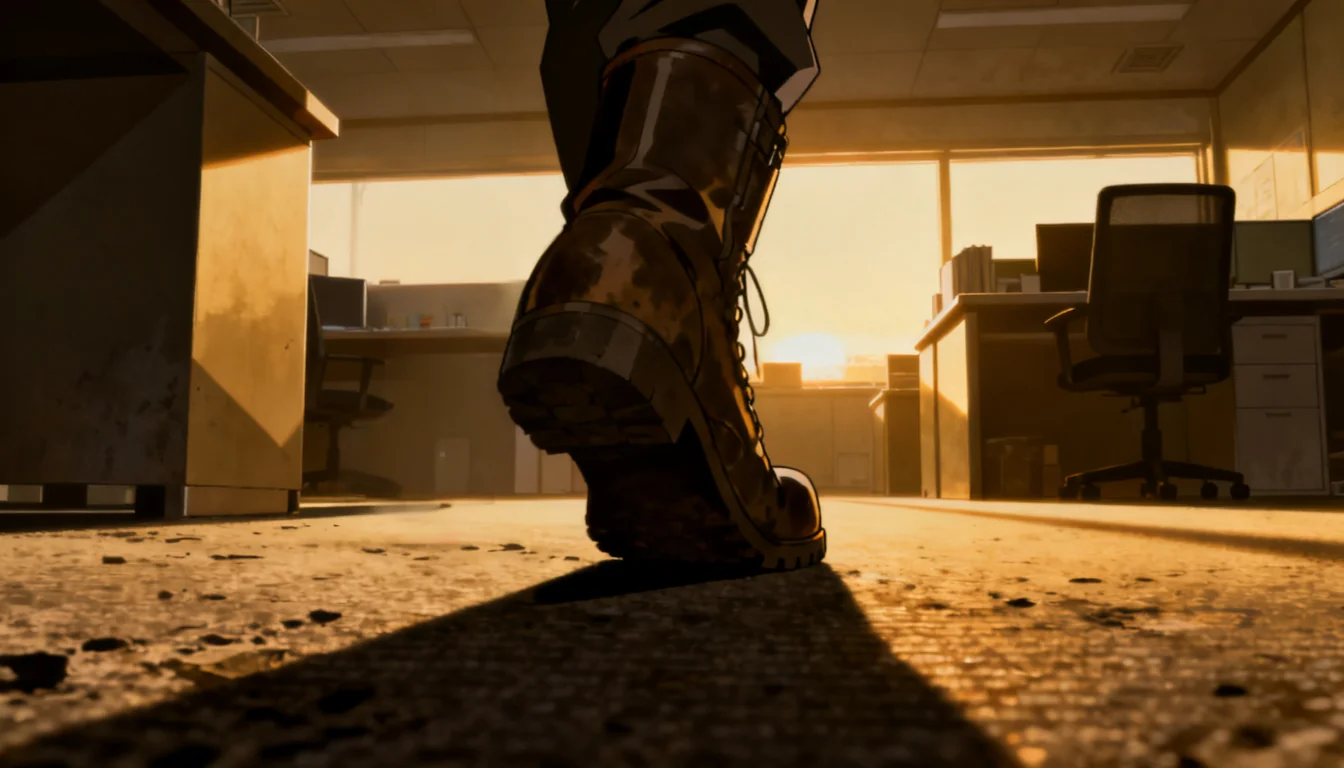
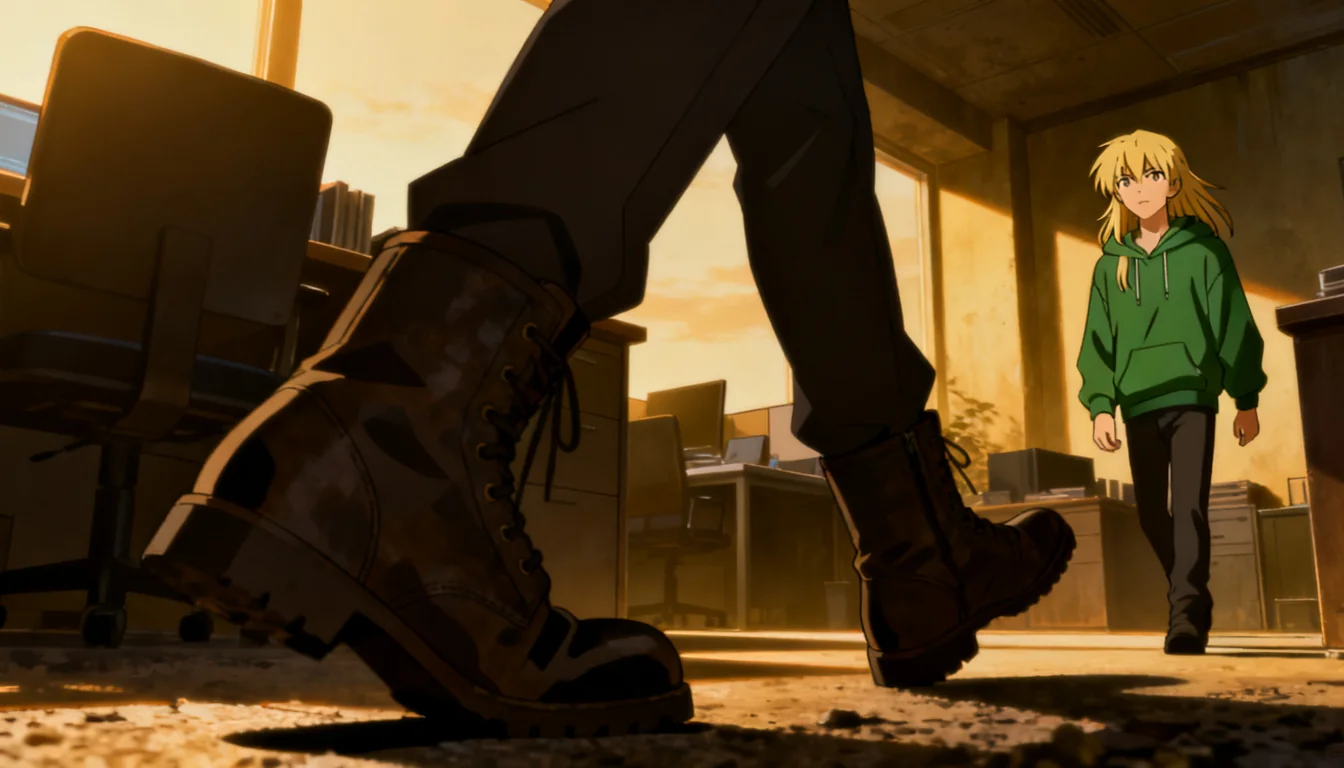
Simplest fix, and usually the right one. Switch the line above to: "Close-Up on his hand, while he is holding a pen." No name, no character render. Here's the exact same shot before and after dropping the name — left still pulls Ben in, right gives you the clean insert you wanted:
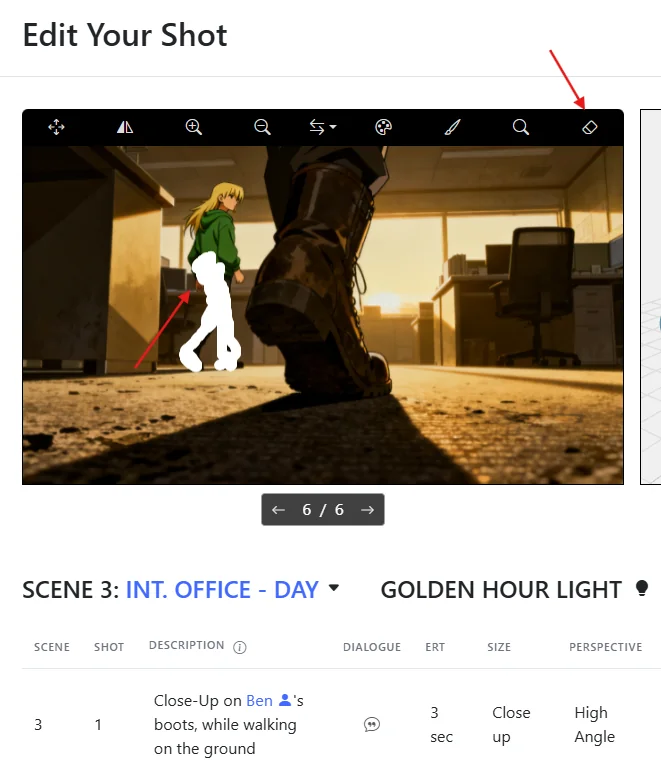
Open the shot in EDIT and use the ERASE tool in the menu bar to manually paint out the face or any part of the person you don't want. Great for surgical fixes where everything else looks perfect — you keep the lighting, composition, and environment intact and just mask out the intruder.
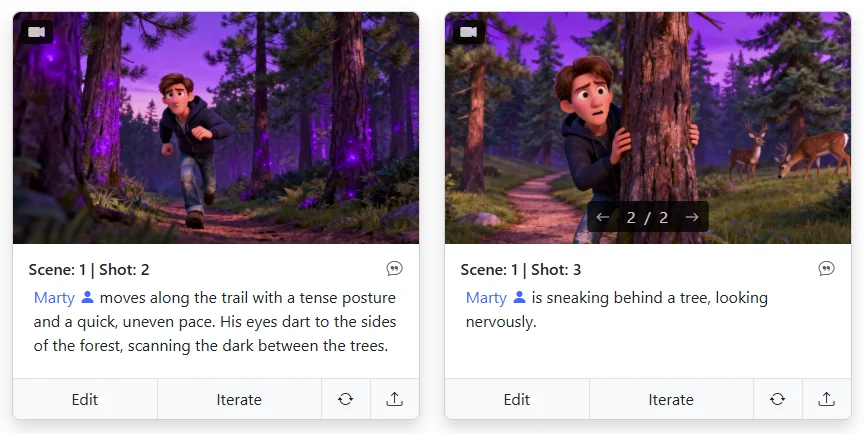
When a rewrite or a manual erase isn't the right fit, hit Iterate and prompt the person out directly:
Start from the shot that has the unwanted character, fire off a short removal prompt, and let the AI rebalance the composition. Here's the full flow — original, Iterate prompt, cleaned-up result:
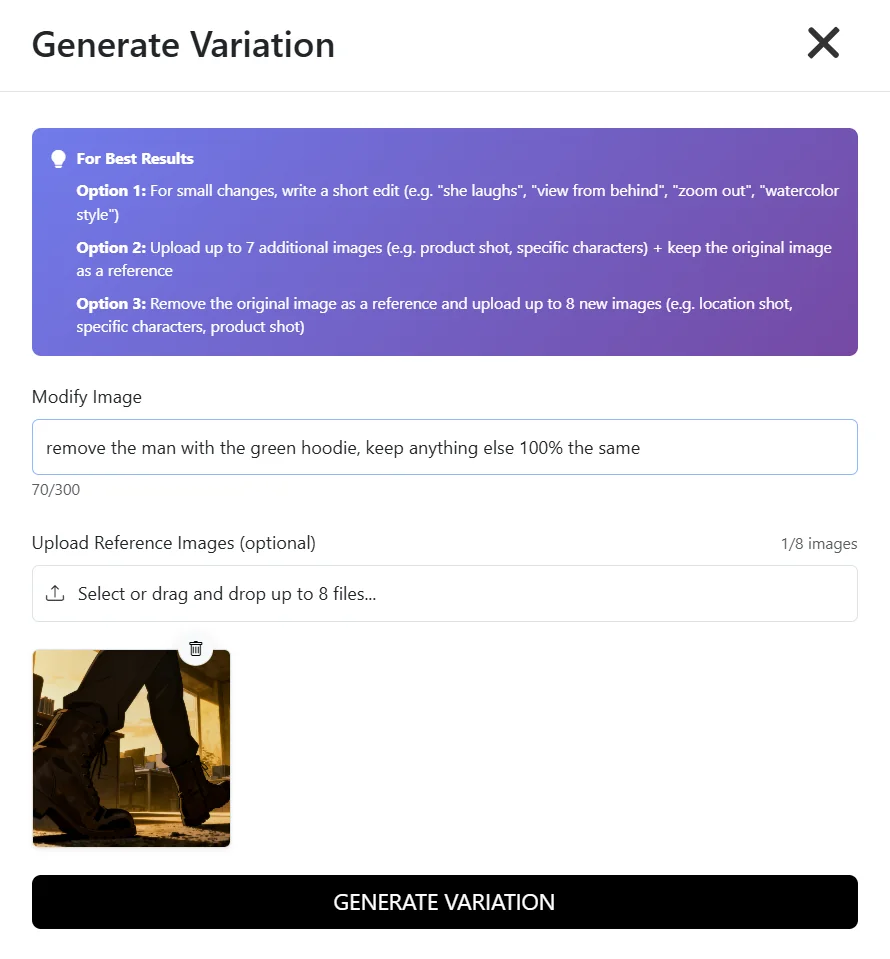
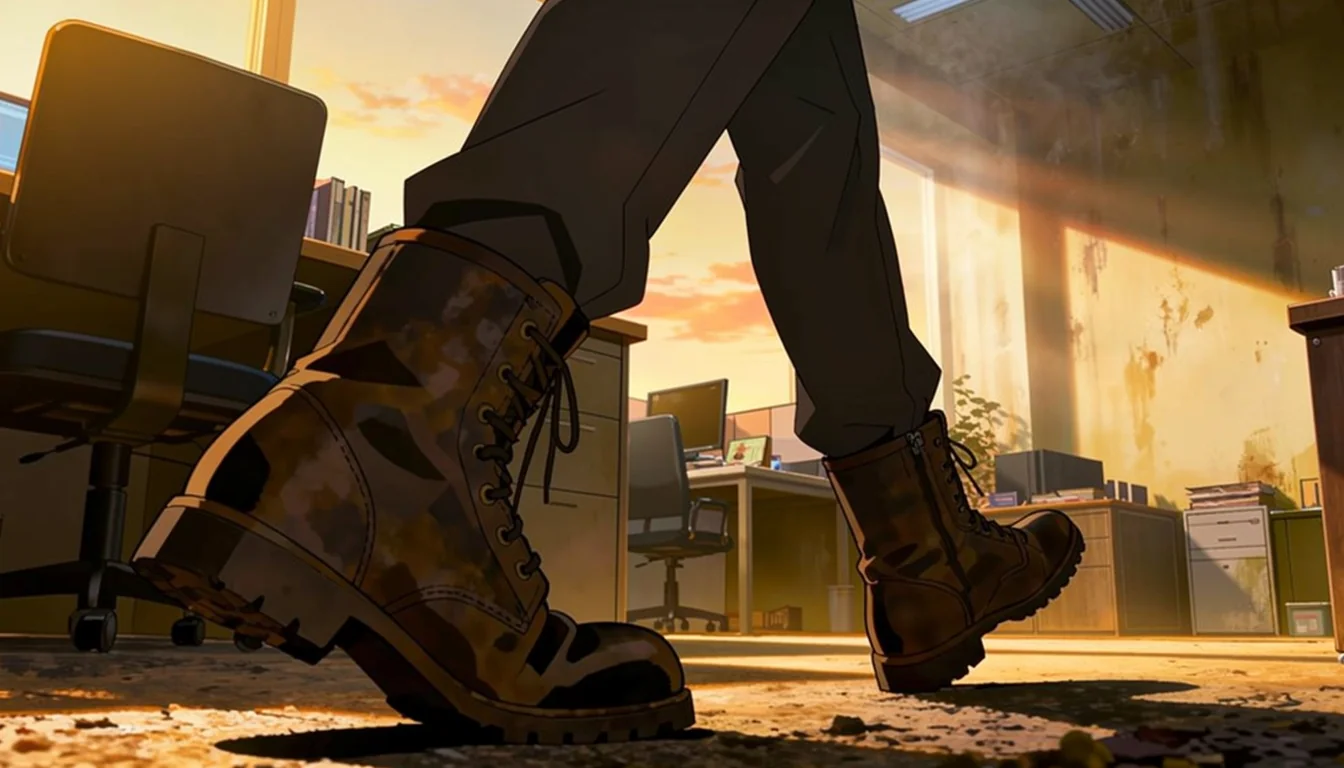
Pick whichever matches the scale of the fix: rewrite for clean starts, Erase for pinpoint edits, Iterate when you want the AI to rebalance the composition.
Problem: Your defined characters are replaced by strangers the AI invented.
Fix: Always reference them by their exact name in the Shot Description — never "the duo", always "Jenny and Don".
You set up your characters in the character editor, wrote a scene, generated the shot -- and your characters are nowhere to be found. Instead, you're looking at random people the AI invented on its own. What happened?
Nine times out of ten, the issue is that you used generic descriptions instead of your characters' actual names. The AI connects your predefined character designs to their names, so if you don't use those names in the shot description, it has no idea which characters to pull in.
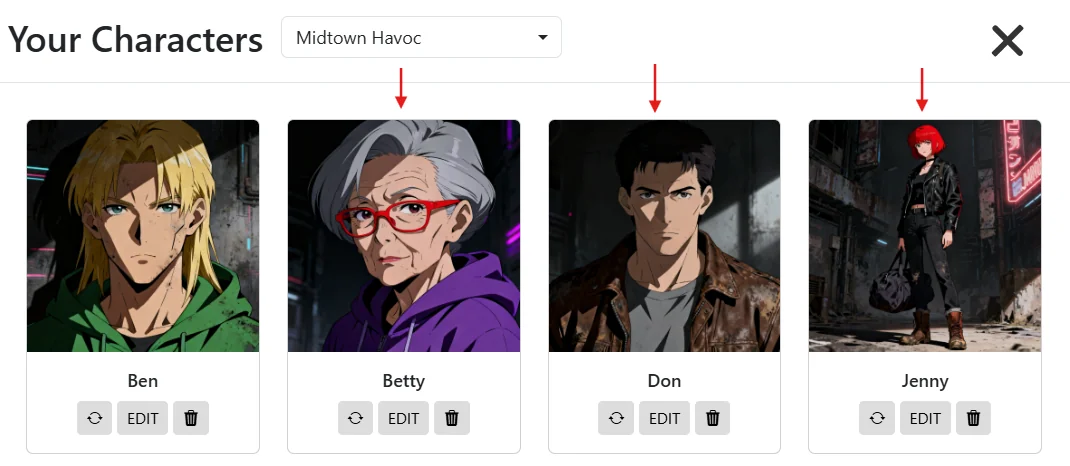
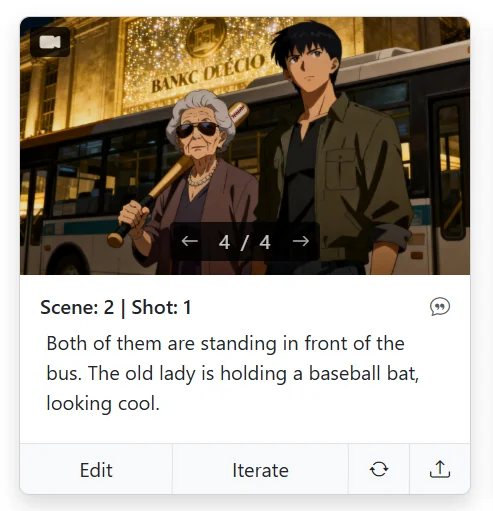
Here's what the problem looks like in practice:
Vague prompt:
"Both of them are standing in front of the bus. The old lady is holding a baseball bat, looking cool."
The AI sees "both of them" and "the old lady" and thinks, "Okay, some people" -- but it doesn't know which people from your character library you mean. So it just makes up new ones.
Better prompt:
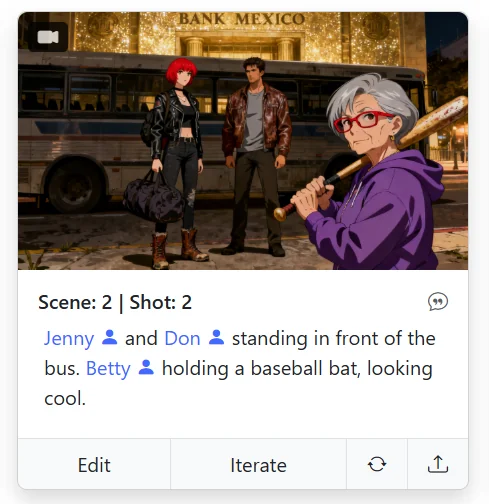
"Jenny and Don standing in front of the bus. Betty holding a baseball bat, looking cool."
Now the AI knows exactly which characters to render, including their appearances, outfits, and any other details you defined in the character editor. Left is what you get from the vague version — random strangers. Right is what you get the moment you use real names — Jenny, Don, and Betty pulled straight from the character library:
This is one of those small habits that makes a huge difference -- always use names, never pronouns or generic references, when you want specific characters to appear.
Problem: Specific products, logos, or vehicles don't show up in your shots.
Fix: Add them to the Object Editor with an image reference, then mention the object by name in the Shot Description and hit Retry.
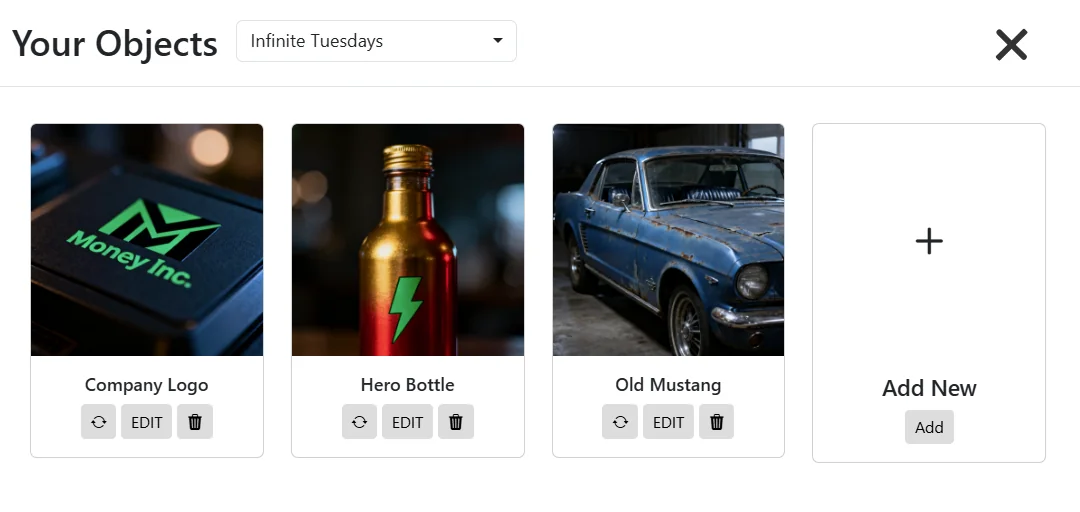
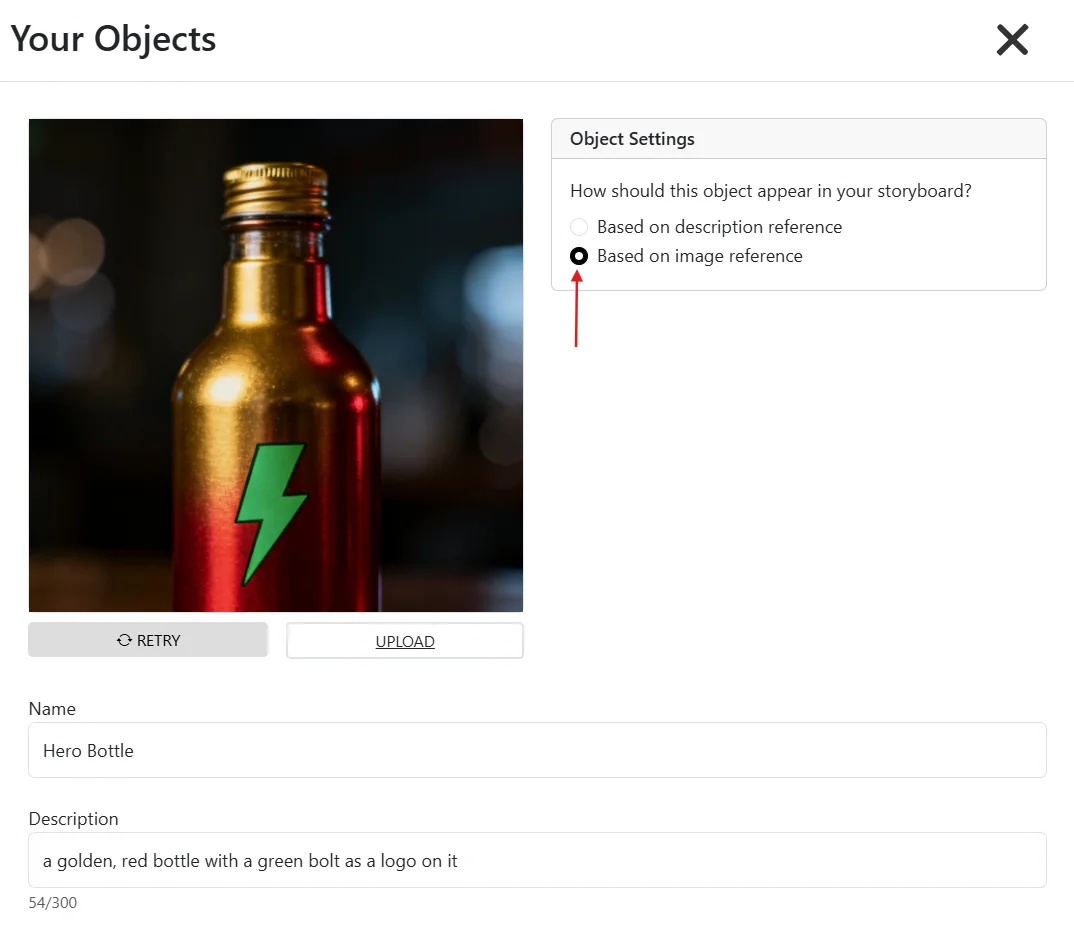
Whether it's a branded product, a hero prop, a specific vehicle, or a client's logo, Storyboarder.ai has a dedicated home for it: the OBJECT editor in the top menu. Here's a typical object library — a logo, a hero bottle, a vehicle, all ready to be slotted into any shot:
Back in your storyboard, all you have to do is mention the object by its exact name in the Shot Description. Something like:
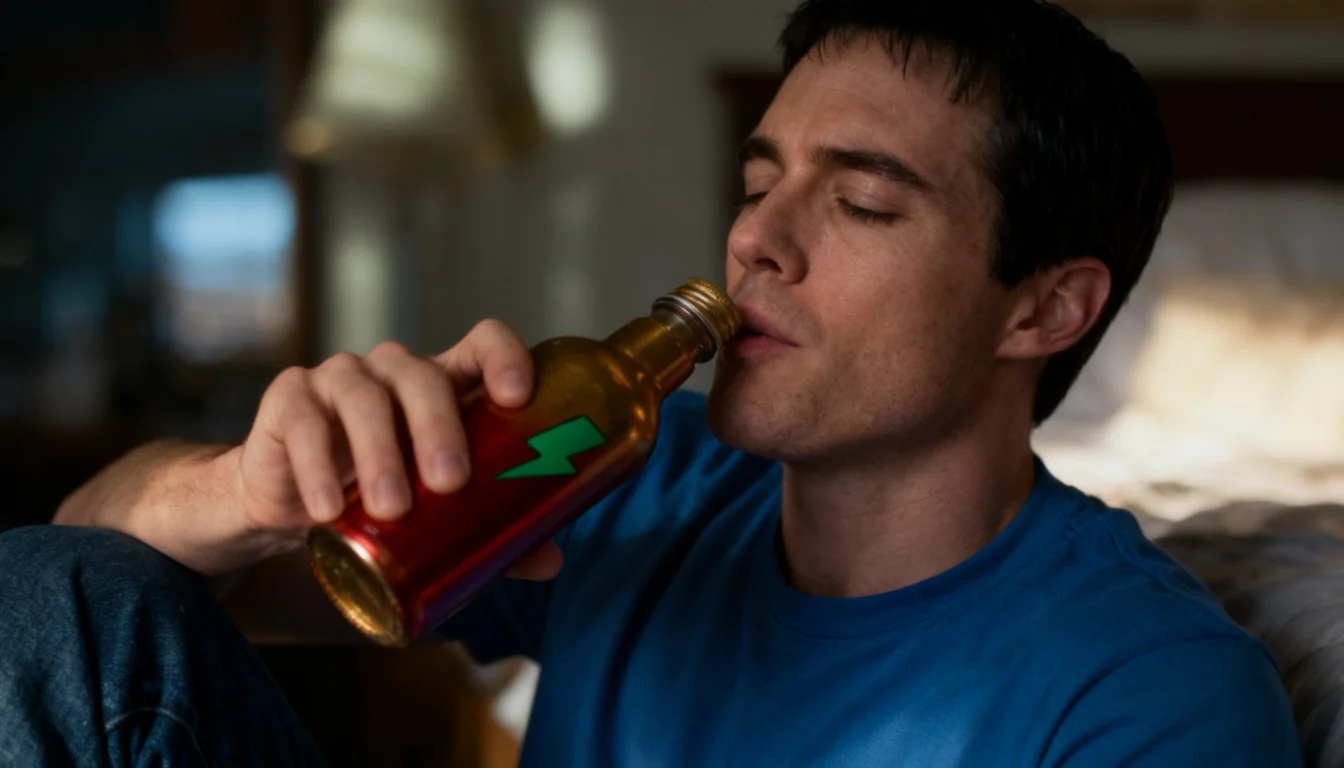
"James is holding the Hero Bottle in his hands and showing it to the camera."
Then hit the Retry icon on that shot. The AI pulls the object from your library, keeps its look faithful to the reference, and places it into the scene. Works the same way for logos appearing on screens, signs, packaging, or t-shirts -- just name the object and let the AI slot it in.
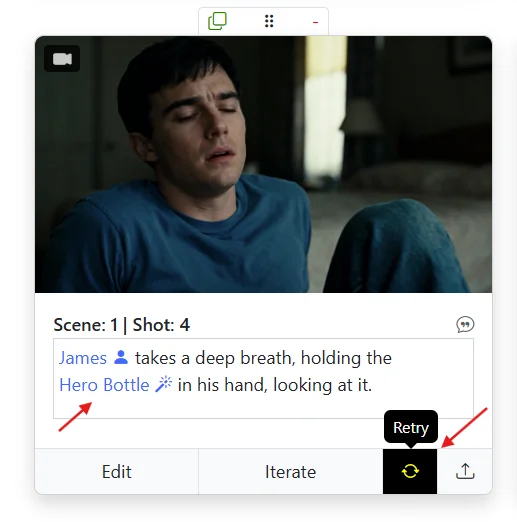
And here's the payoff — the exact bottle from the object library rendered into the scene, logo and all:
A few practical tips:
Problem: Your character's wardrobe keeps drifting between shots.
Fix: Be specific in the main character description (material, color, pattern, hardware). For scene-specific outfits, use the "Clothing & Accessories" section and strip clothing from the main description — never both at once.
You built your character in the Character Editor, described them carefully, and yet in shot three the jacket is suddenly a different color, in shot five it's a different cut entirely. Wardrobe drift is one of the most common consistency issues -- and it's almost always fixable in the Character Editor.
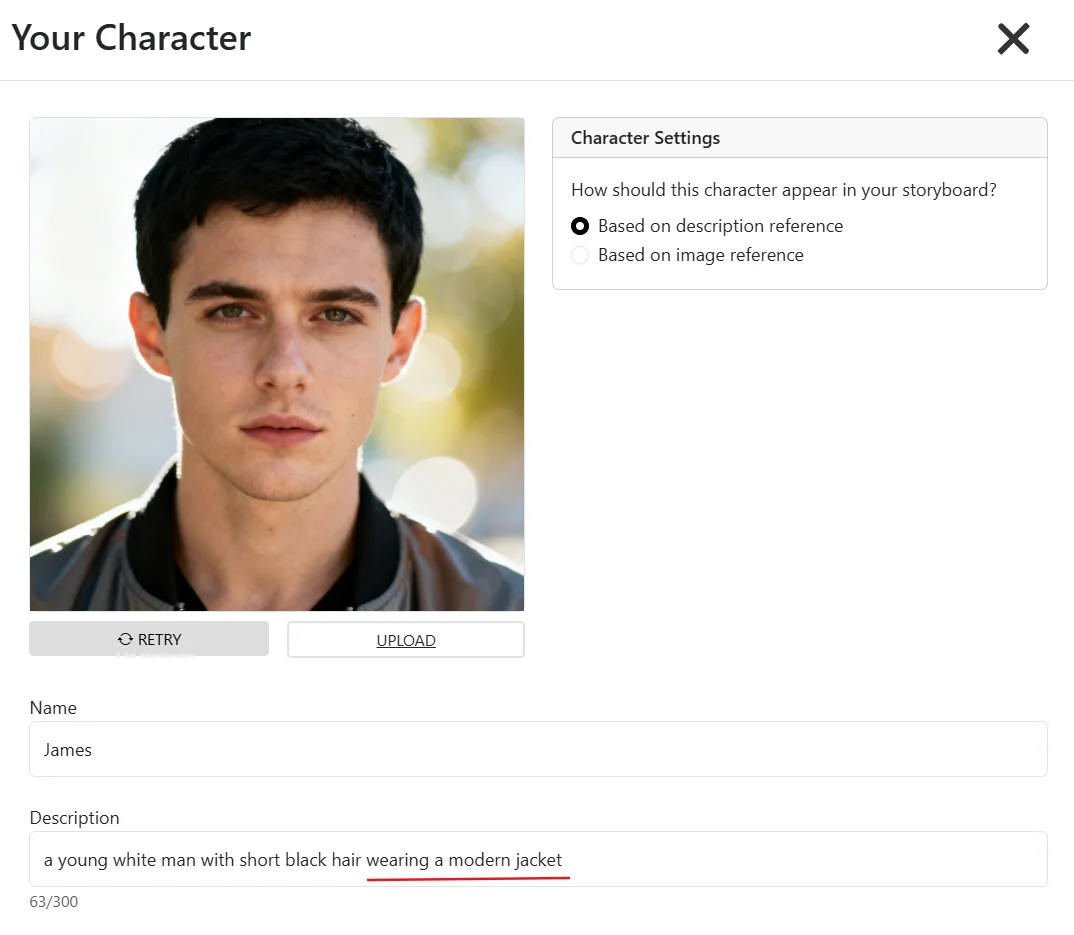
In the general character description, you can absolutely include clothing as free text -- but the level of detail matters more than you'd think. A throwaway line like "wearing a modern jacket" is basically an invitation for the AI to reinterpret the jacket every single shot. Every time.
Compare:
Too vague: "...wearing a modern jacket."
Specific and stable: "...wearing a modern red-striped leather jacket with a golden zipper."
The more concrete visual anchors you give (material, color, pattern, hardware, cut), the less room the AI has to improvise. Short and vague = drift. Specific and textured = consistency.
Here's the vague version in the Character Editor, and what it looks like across six shots — the "modern jacket" becomes a different garment almost every frame:
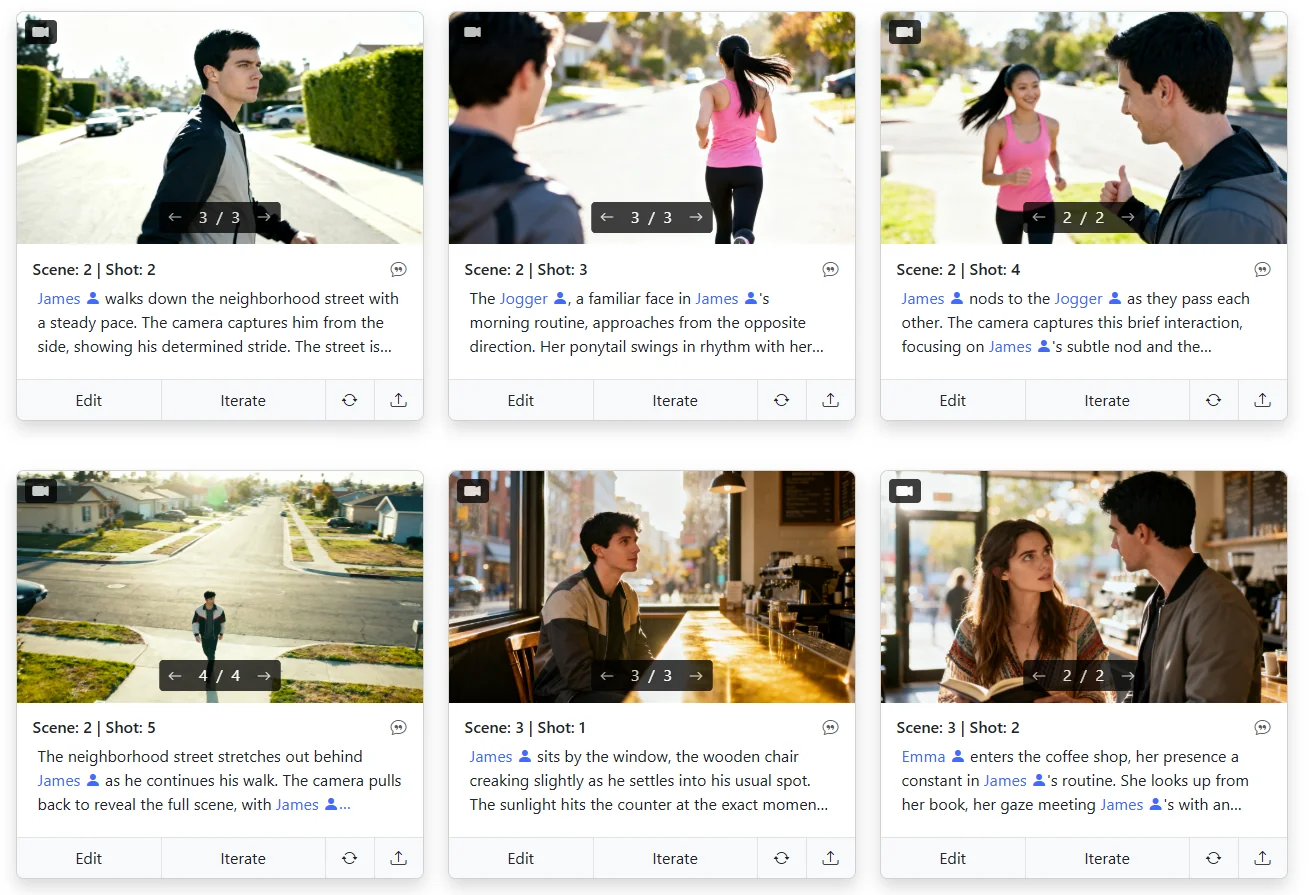
Now the specific version — same character, same scenes, but with a precise clothing description. The red-striped leather jacket with the golden zipper stays locked across every single shot:
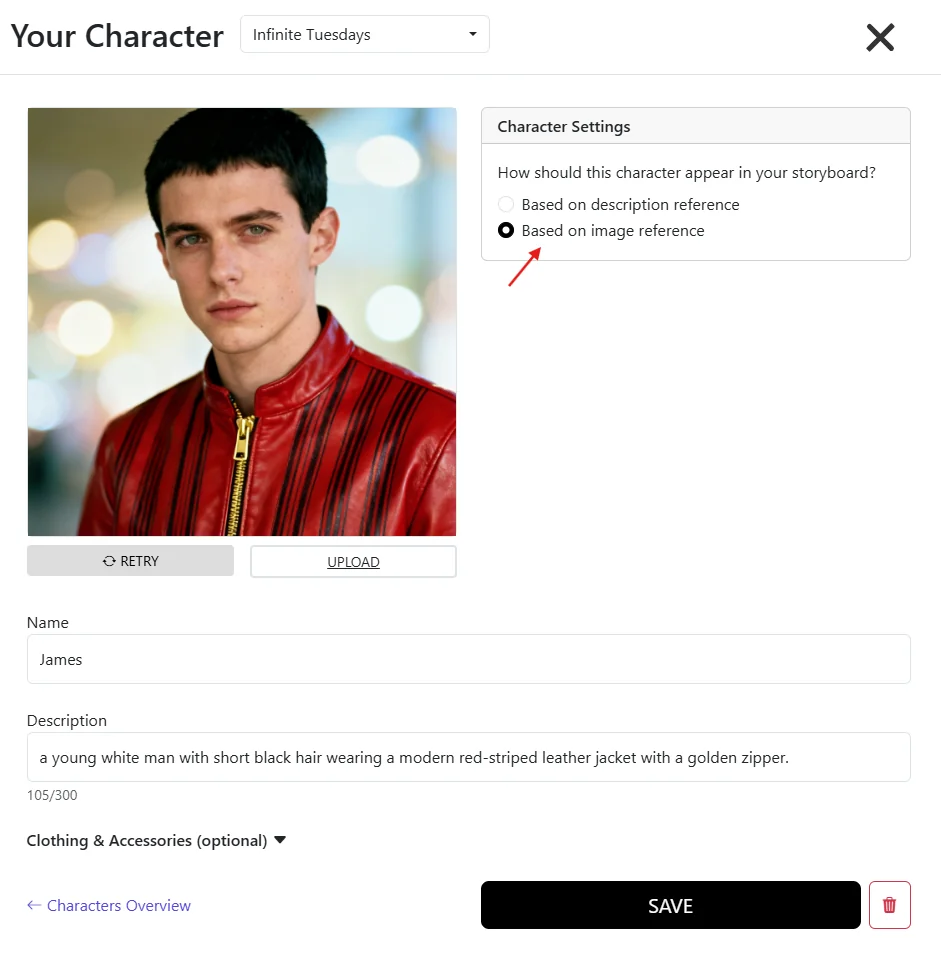
Under the main character description there's a dedicated "Clothing & Accessories" section. This is the right tool when your character's outfit actually should change across scenes -- say, a suit at the office in Scene 1, gym clothes in Scene 2, a tuxedo for the gala in Scene 3.
Here's the critical trick most people miss: when you use the Clothing & Accessories section, you need to add the specific outfit for every single scene where the character appears, and remove the clothing information from the main description at the same time.
Why? Because if you have clothing in both places, the AI is getting two contradictory signals -- "wear the red leather jacket" from the main description and "wear the tuxedo" from the scene-specific section. The result is usually a confused hybrid, or the AI flipping between the two across shots.
So the rule is simple:
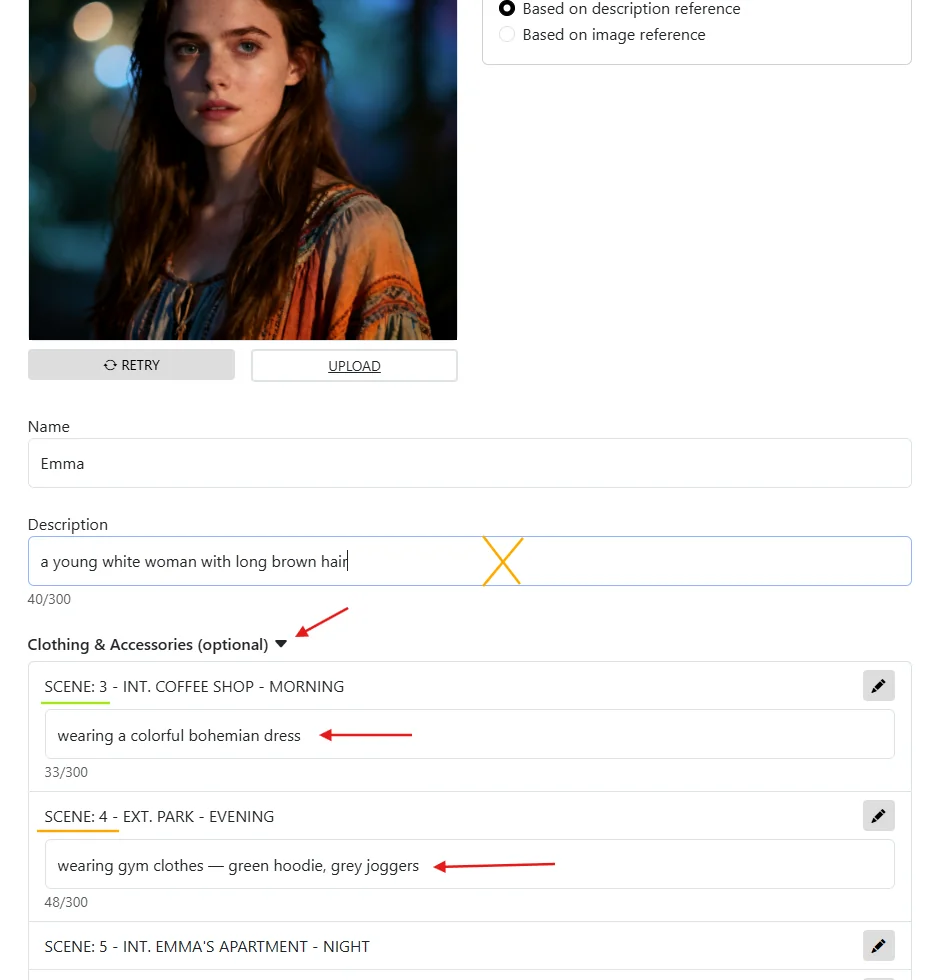
Here's what that looks like for Emma — clothing stripped from the main description (crossed out), and each scene getting its own outfit in the Clothing & Accessories section:
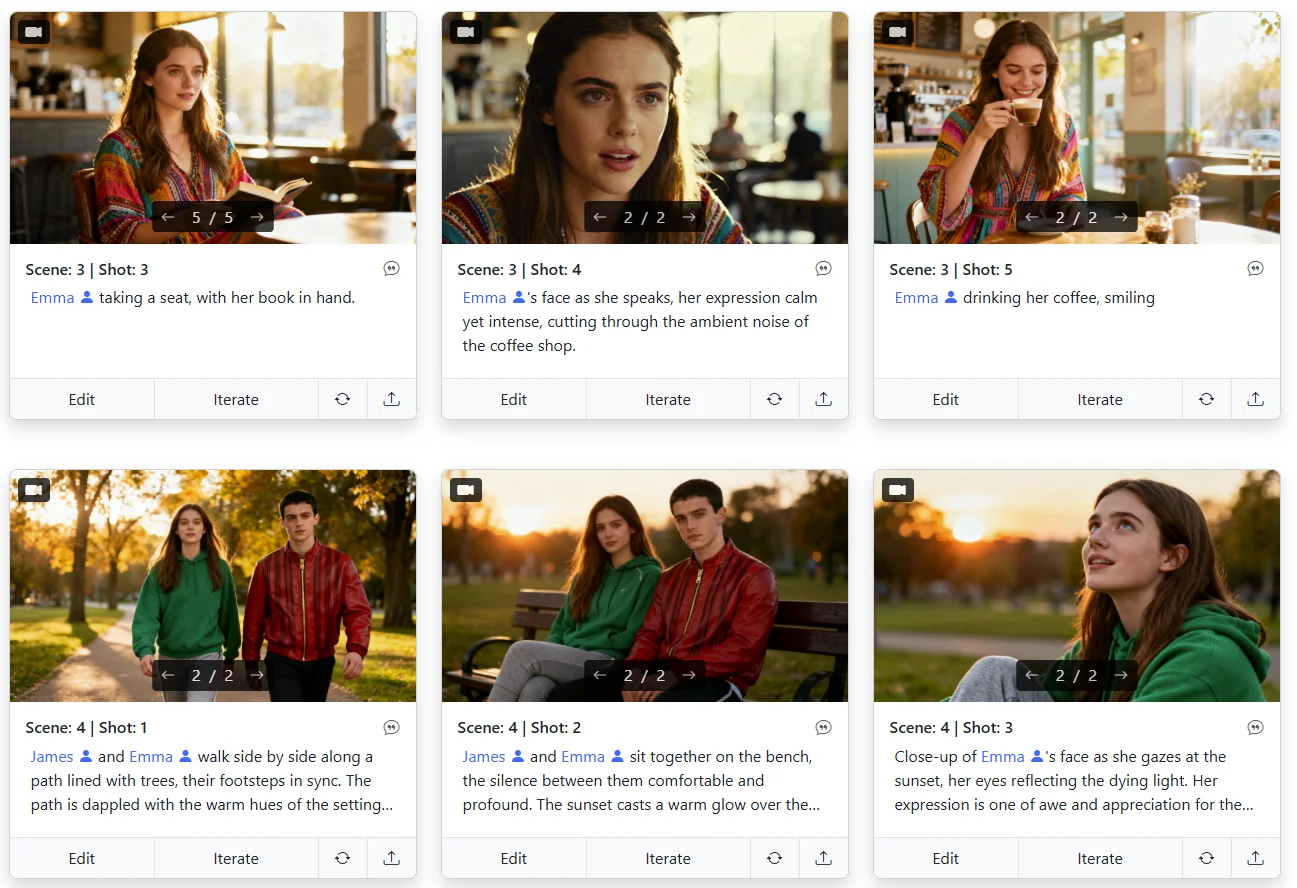
And this is the payoff in the storyboard — Emma in her bohemian dress through the coffee shop scene, then in a green hoodie for the park scene. The outfits switch by scene exactly as defined, without the AI getting confused:
Get that split right and wardrobe stops drifting almost overnight.
We're actively updating and expanding this Prompt Guide based on what our users are running into. Every time someone discovers a clever technique or hits a wall we haven't covered yet, that becomes a candidate for the next update.
If you're stuck on something specific -- maybe you're trying to get a tricky camera angle to work, or you can't figure out how to keep a prop consistent across a sequence -- don't struggle in silence. Chances are excellent that other users have the same question, and your scenario could become the next section in this guide.
Drop us a message via the in-app chat support or shoot an email to info@storyboarder.ai. We're happy to help you troubleshoot your specific prompts and, if it's a common enough challenge, we'll write it up here so everyone benefits.
For even more tutorials, walkthroughs, and answers to specific questions, head over to our Help Center: help.storyboarder.ai.

Learn the tricks pros use to keep faces, outfits, and vibes aligned across every frame.
Read Article →
Why Storyboarder.ai is the top pick for filmmakers worldwide.
Read Article →
Avoid the most common storyboarding pitfalls with these AI-powered solutions.
Read Article →